Create realistic software simulations with enhanced shapes in Adobe Captivate

Have you ever wished you could teach someone how to use software without having to sit next to them the whole time? Adobe Captivate makes it possible. It allows you to record your actions on the screen and turn them into a fully interactive learning experience. Whether you want to show others how to navigate a website, fill out a form, or use a complex tool, Captivate has you covered.
Finally, you’ll learn how to build a software simulation, add visual shapes and interactive elements to make it look polished, and deliver lessons that feel authentic and engaging.
What is software simulation?
Software simulations are like recorded walkthroughs of software applications. Adobe Captivate monitors what you do on your screen (mouse clicks, keyboard input, and navigation) and converts all of it into interactive eLearning courses.
Learners then watch the course and can watch you do it, practice it themselves, or take a test. It’s a safe, controlled way for people to learn the software without touching the actual application.
Three simulation modes
Before you start recording, you need to decide what kind of simulation you want to create. Captivate offers three modes, and you can actually record all three at the same time.
Demo mode It’s for show. Learners will watch you complete the task without having to do anything themselves. Captivate automatically adds a text caption describing each action as it occurs. This is great for a quick introduction or when you just want to let someone understand how something works.
training mode It’s for practice. Here, learners have to interact with the simulation. They have to click on the correct area, and if they’re wrong, a helpful message appears telling them to try again. Tips will also pop up if they hover near the correct location. This model builds learners’ confidence before moving on to real-world applications.
Assessment method for testing. It works like training mode, but without prompts. Test the user’s understanding of the program. Notify the user only if a step is performed incorrectly.
Set up your simulation
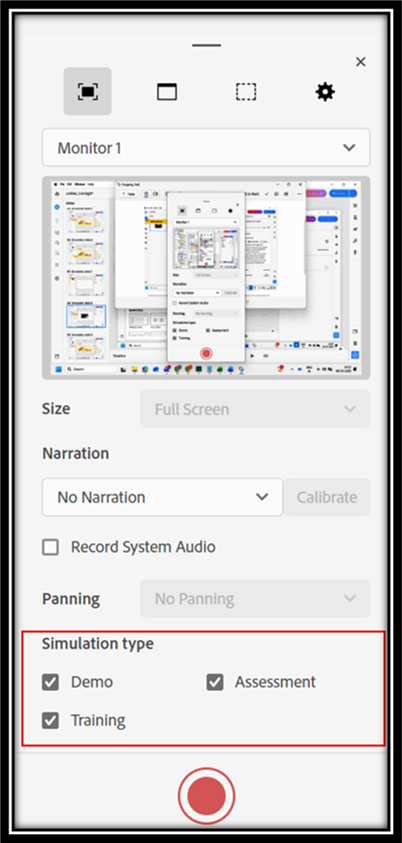
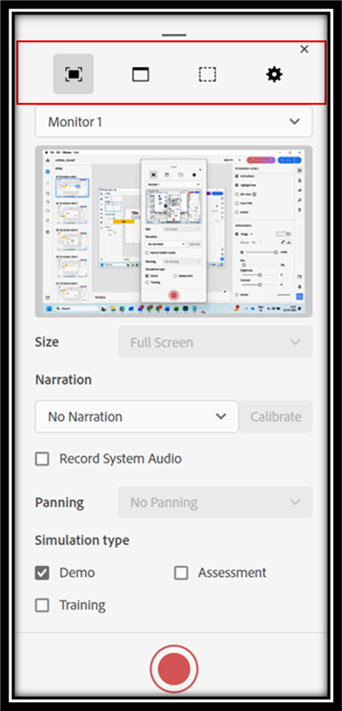
First, open Adobe Captivate and click new simulation on the welcome screen. A launcher dialog will appear where you can choose how to record your screen.
The recording window has three options. full screen capture Record your entire monitor – useful if your workflow spans the entire screen. If you have two monitors, you can choose which one to use. Application window Stay focused by narrowing your recording to a specific open app. Custom size If you need something specific, you can define your own width and height.
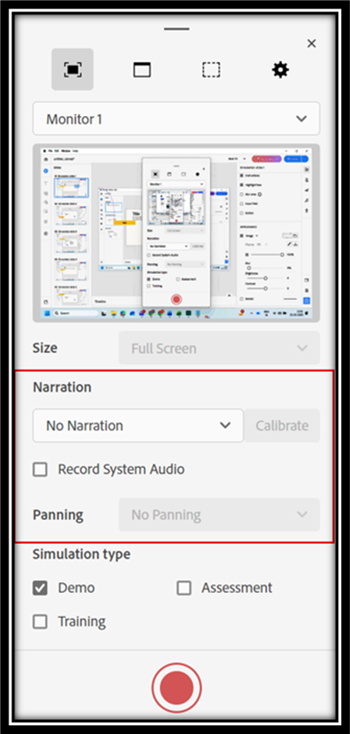
After selecting the window type, you can also set up narration by selecting the microphone and enable panning when the screen is larger. Panning allows the recording window to follow the mouse movement so that it is not cut off. You can set it to move automatically or manually.
recording studio
When recording starts, a message called Recording box Appears in the lower right corner of the screen. You can drag it anywhere – it won’t affect your recording.
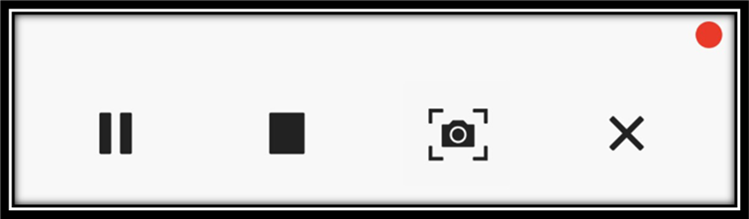
A flashing red dot on the pod indicates you’re recording. This pod gives you four controls. play/pause Allows you to temporarily stop and resume recording. stop End session – You can also press Cmd + return on Mac or ending Keystrokes on Windows. Take screenshot Take manual snapshots at any time and add them as a slideshow to your project. Cancel End recording without saving anything.
Enhance your slides with shapes and components
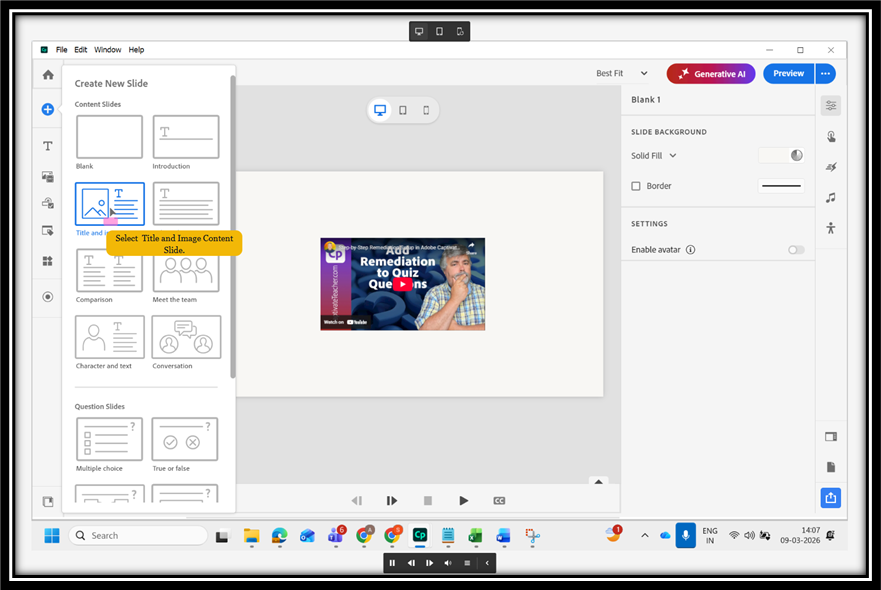
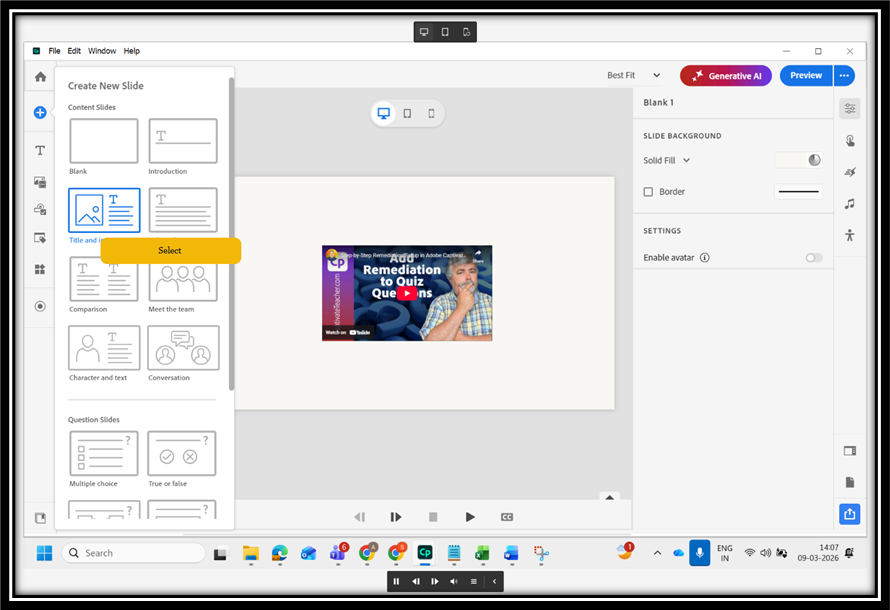
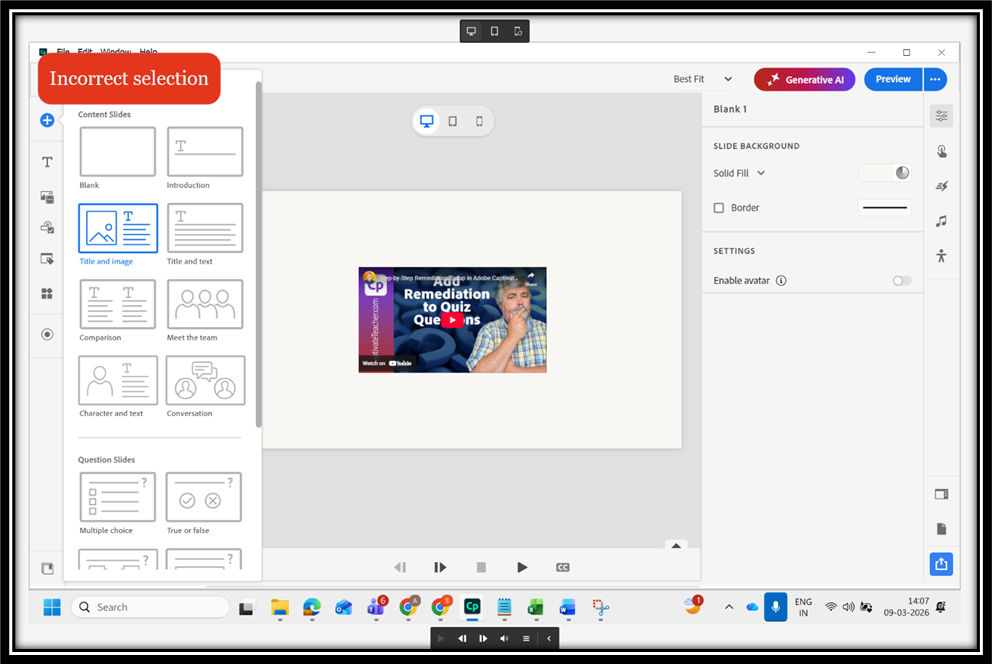
Once the recording is complete, Captivate creates a series of slides, one for each key action you performed. These slides look like screenshots of the software you recorded. But here’s where it gets interesting: You can add visual shapes and interactive elements to each slide to make the simulation richer and more realistic.
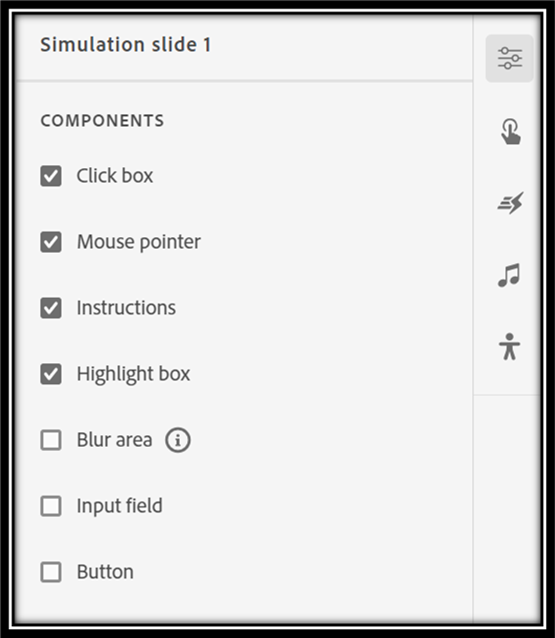
exist visual properties panel, in Element section, you will find several elements that can be placed on any slide.
The clickbox is an invisible area on the slide that learners must click to proceed to the next step. Think of it as a hot spot. You can place it on a button, menu, or any area of the screen. In training and evaluation modes, click boxes are automatically created based on where you clicked during recording. You can also add or adjust them manually.
The mouse pointer shows the path the cursor takes between actions. By default, Captivate draws a gently curved path that looks natural and human-like. But you can switch to straight paths if they suit your workflow better – for example, when clicking quickly on a toolbar.
You can also change the visual appearance of the pointer, making it larger or smaller, add click animations (quick bursts of color that highlight where learners click), and change or mute the click sound.
Instructions are text boxes that appear on a slide to guide learners. You can add up to three description blocks to each slide. They are great for telling learners what to do next. Once you select a command, you can fully customize it – change the background color, add borders, adjust shadows and control opacity so it blends seamlessly with your slides. You can even drag it to different locations on the screen.
A highlight box is a colored rectangle that draws the learner’s attention to a specific part of the slide. It will automatically be added around the area you clicked during recording. You can keep it, delete it, resize it, change its color, add a gradient fill, or apply a shadow. Adjusting the opacity can make it more or less visible, depending on how subtle you want it to be.
If your screen recording captures any sensitive information (such as personal emails, passwords, or phone numbers), the blur zone tool is your best friend. You add a blur shape over the area and it hides the message from the learner.
You can control the intensity of the blur using the Strength slider. The shape can be rectangular or circular. You can also adjust the corner radius to soften edges and add a border around them. All of these controls can be found in the Visual Properties panel with the blur component selected.
Input fields allow learners to enter answers directly into the simulation slide. This is useful when you want to simulate filling out a form or entering a search query.
Buttons are clickable elements that can be added to a simulated slideshow. They can take learners to the next slide, trigger specific actions, or navigate to another part of the course. They increase interactivity and give learners more control over their experience. You can add multiple buttons to a slide.
All of these settings are located in the Visual Properties panel under Appearance and Settings. When satisfied, click Apply to all slides Update each slide in the project at once.
Change background appearance
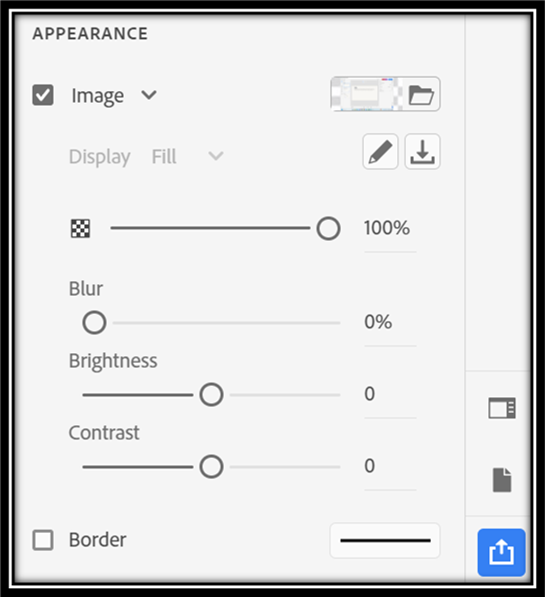
In addition to shapes and components, you can also change the appearance of your slide background. exist appearance section, select the Image drop-down list to apply a solid color fill or gradient to the background. Or select the actual image from your computer or Captivate’s built-in library. You can crop the background image, add a border around it, or download it.
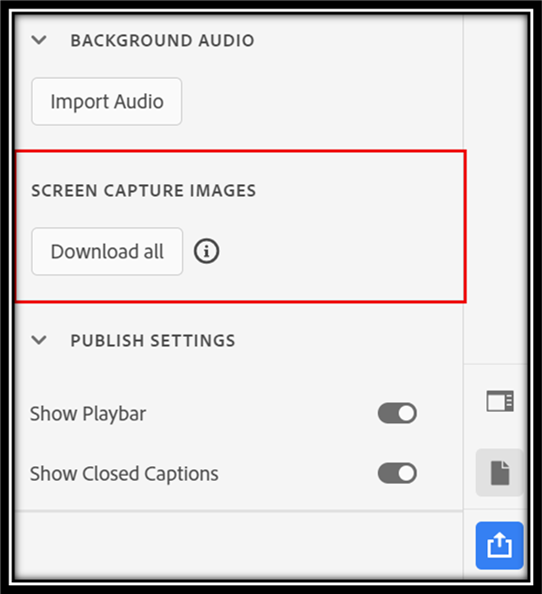
If you want to save all the background images in your project at once, go to Project properties and click on the toolbar on the right Download all images – Captivate will save them all to a folder on your computer.
Full motion recording, smooth movements
Some actions are difficult to capture with static screenshots. Dragging and dropping, scrolling through a list, or hovering over a menu may not look like a series of static slideshows. that’s there Full Motion Recording (FMR) Helpful.
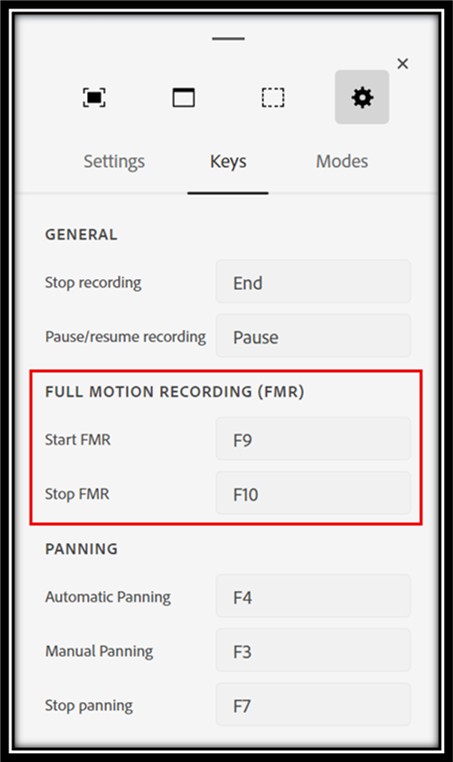
FMR records everything as a continuous video clip rather than individual screenshots. It starts automatically if your mouse moves outside the recording boundaries. You can also turn it on and off manually using keyboard shortcuts – Fn+F9 start and Fn+F10 Stop on Windows, or Cmd + F9 and Cmd + F10 on macOS.
FMR slideshows appear as movies in the timeline. You can still add components like click boxes and captions to these video slides just like regular analog slides. The main difference is that FMR slideshows are played as videos, while regular simulation slideshows are static images.
Add simulation to existing project
You don’t have to create a new project every time you want to add a new simulation. If you already have a Captivate course, you can record new simulations directly into it.
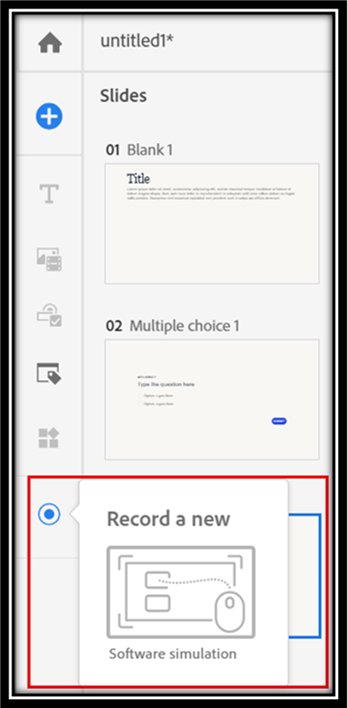
To open your existing project, click capture in the left toolbar and select software simulation. The recording launcher will appear. Select your simulation type and press Recordonce completed, the new simulation slide will be added directly to your existing project.
One little thing to note: if your recording is smaller than 1366 × 768 pixels, Captivate will fit it into a standard-sized slideshow. If larger, the slideshow will grow to fit the recording size.
in conclusion
Adobe Captivate makes it incredibly easy to create software simulations that look and feel professional. The combination of recording mode, visual components like highlight boxes and blur areas, customizable commands, and mouse pointer settings give you everything you need to create an experience that truly reflects the experience of using real software.
Start with a simple briefing to familiarize yourself with the tools, then explore training and assessment modes to take your courses to the next level. Once you see how much your learners benefit from practicing in a safe environment, you’ll never go back to mere screenshots or written instructions.


