
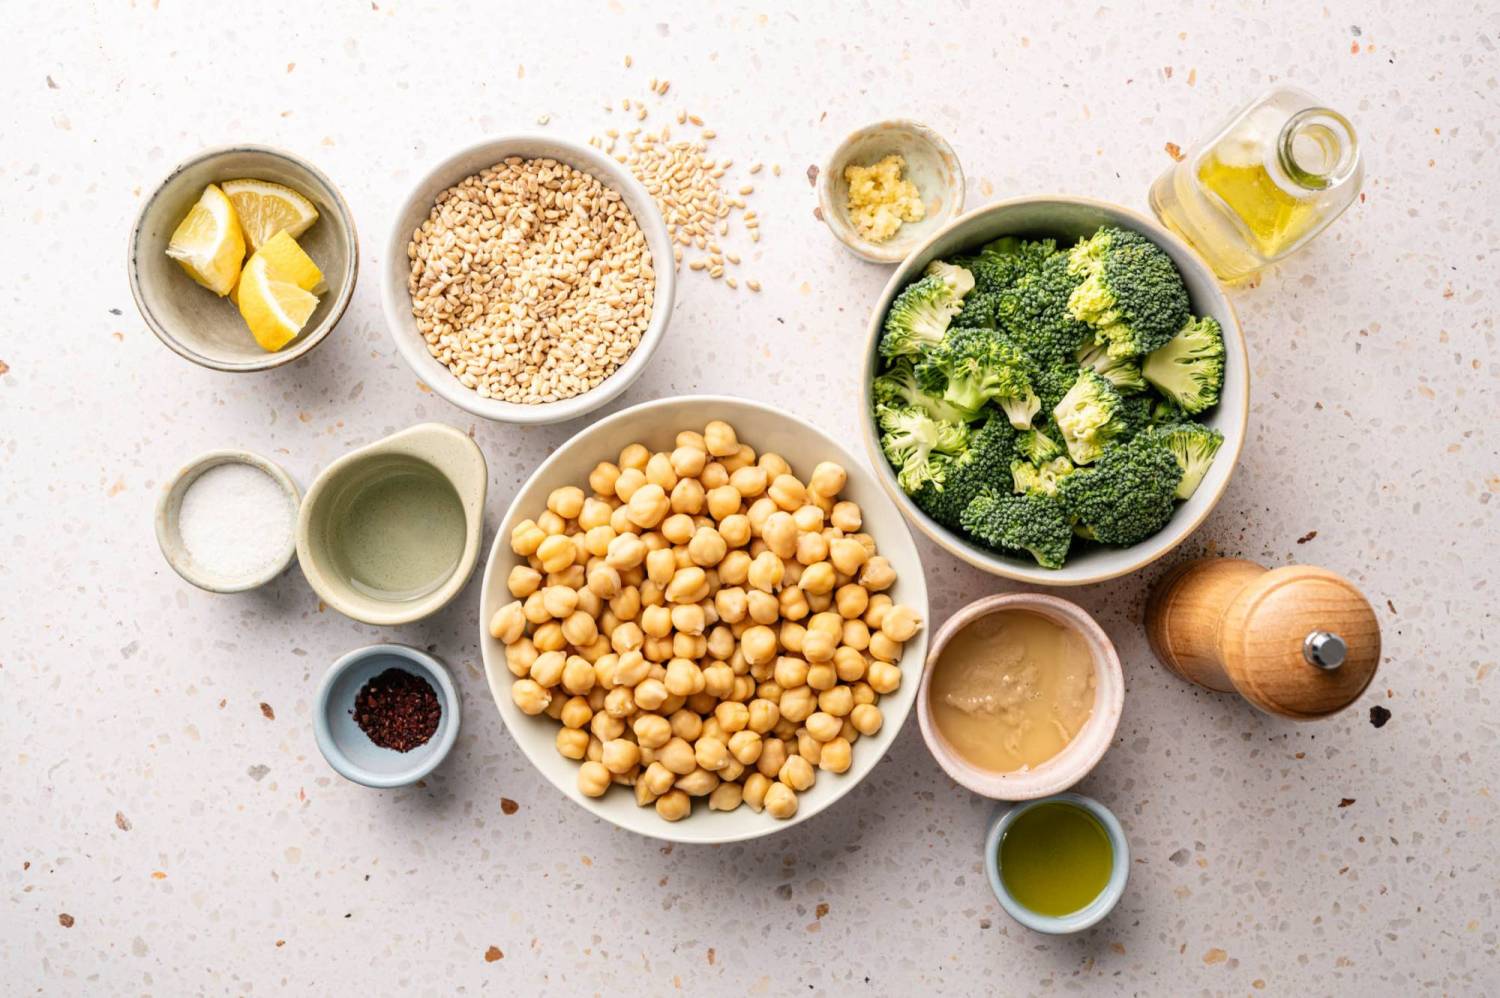
These Farro Bowls with Broccoli and Chickpeas are a comforting vegetarian grain bowl with chewy farro, crispy roasted veggies, and a bright lemony tahini dressing. They’re infinitely customizable, perfect for meal prep, and use simple ingredients you probably already have at home!
649 Carl
76 grams of carbohydrates
32 grams fat
24 grams of protein
9
Farro Bowls with Broccoli and Chickpeas Recipe
Before you get started, here are some simple tips so your farro bowl comes out perfect every time.
- Rinse the farro: Place the farro in a fine mesh sieve and rinse quickly under cold water. This helps remove excess starch and any dust, so the cooked grains are chewy rather than stringy.
- Use the correct liquid ratio: For every cup of farro, you’ll need about two cups of water or broth. Using stock instead of water adds extra flavor to the bottom of the bowl.
- Chop broccoli evenly: Cut the broccoli into similar sized florets so they roast evenly. Smaller pieces will get crispier; larger florets will stay a little more tender in the center.
- Dry the chickpeas well: After rinsing the chickpeas, pat dry with a clean towel or paper towel. Dried chickpeas will crisp up more in the oven and won’t cook in the pan.
- Prepare sesame paste ingredients: Tahini can be thick, so have lemon juice, garlic, water, and seasonings ready. This makes it easier to thin the sauce to a smooth, pourable consistency without adding too much water.
How to Make Farro Bowls with Broccoli and Chickpeas
Here’s a quick overview of how to put these farro bowls together from start to finish.
1. Cooking Farro
Add the rinsed farro and water or broth to the pot and add a pinch of salt. Bring to a boil, then simmer, covered, and cook until the grains are tender but still al dente. Drain excess liquid and set farro aside.
2. Roasted Broccoli and Chickpeas
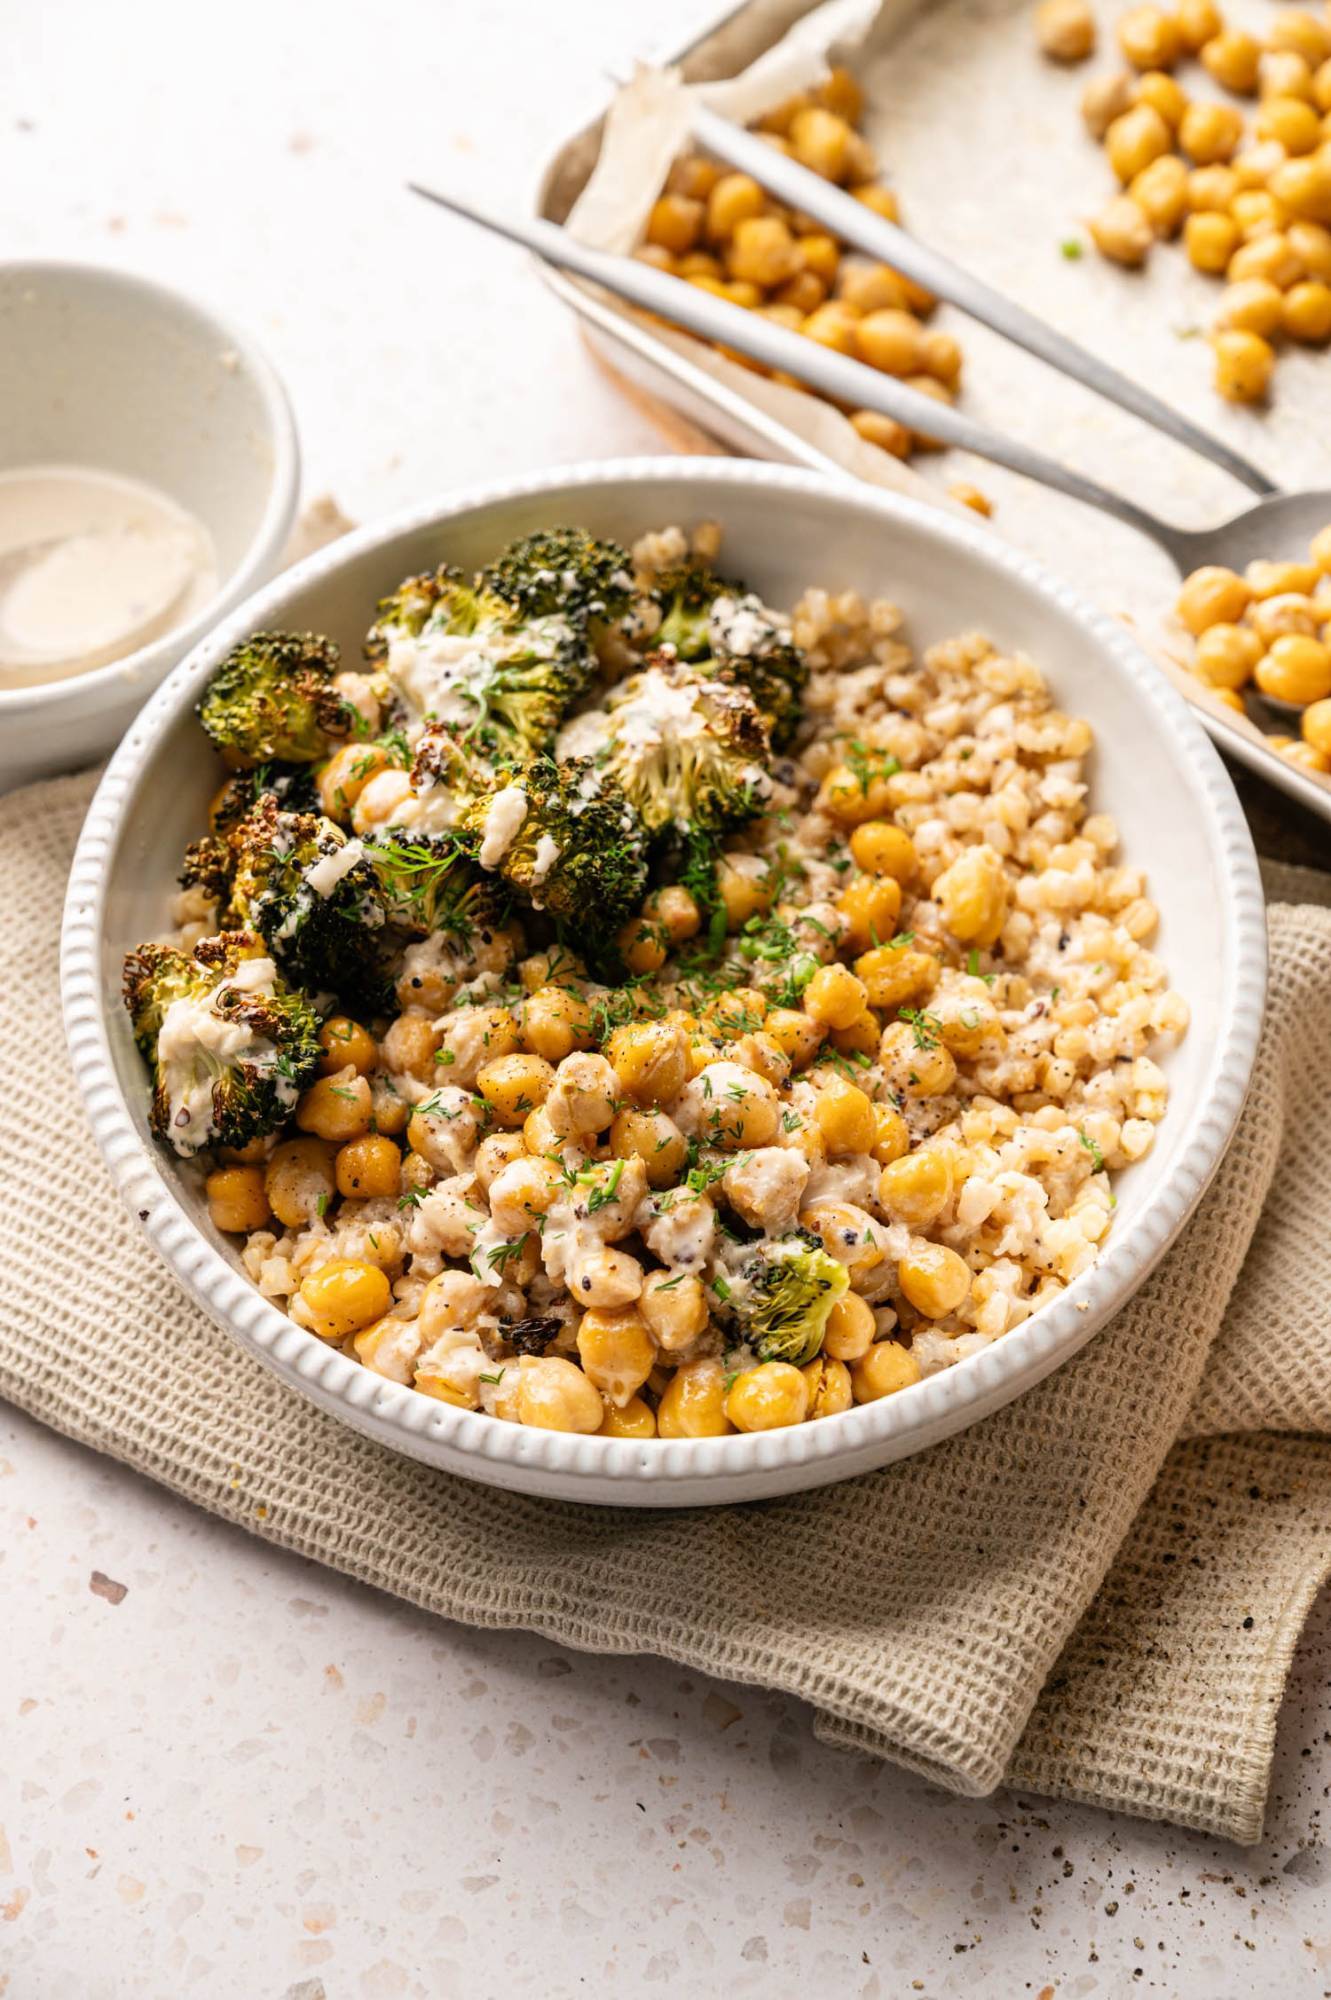
Spread the broccoli florets on a baking sheet and toss with olive oil, salt and pepper. Roast until the broccoli starts to brown and crisps around the edges, then add the chickpeas to the same pan and continue roasting until everything is golden brown and slightly crispy.
3. Make Lemon Tahini Sauce
While the vegetables are roasting, chop the garlic and sprinkle with a pinch of kosher salt. Use the side of a knife to press it into a paste. Stir the garlic paste into the tahini along with the lemon juice and slowly stir in a little at a time until the sauce is smooth and pourable. Season with salt, pepper and red pepper flakes.
4. Assemble the bowl
Add a spoonful of farro to each bowl and top with roasted broccoli and chickpeas. Drizzle generously with lemon tahini and finish with any additional toppings you like, such as herbs, nuts or seeds.
Farro’s Instant Pot Method
If you prefer using your Instant Pot, here’s an easy way to cook farro in these bowls.
- Rinse the grains: Place the farro in a fine-mesh sieve and rinse with cold water until the water is mostly clear.
- Add to the pot: Add the farro and water or stock to the Instant Pot and add a pinch of kosher salt. The ratio of farro to liquid is about 1:2.
- Pressure cooker: Seal the Instant Pot and cook by hand/pressure until the farro is tender and al dente. Allow pressure to release naturally before opening lid.
- Drainage and fluff: Drain excess liquid if necessary, then fluff the farro with a fork and transfer to a grain bowl as usual.
Recipe Tips and Tricks
Here are the best pro tips for making these farro bowls with broccoli and chickpeas come out perfect every time.
- Change grains: If you don’t have farro or want a gluten-free option, switch to quinoa, brown rice, barley, or another cooked grain of your choice. Just cook individually according to package instructions and assemble the bowls the same way.
- Play with vegetables: The roasted broccoli here is delicious, but you could also add a mix of cauliflower, Brussels sprouts, zucchini, sweet potatoes, green beans or whatever you have in the crisper box. Just cut everything into similar sizes so they bake evenly.
- Add protein: These farro and broccoli bowls add some protein and great flavor. Shrimp, tofu, grilled chicken, and poached or boiled eggs are some possible options for this dish that tastes great. They’re also delicious paired with black beans, like these Cuban Black Bean Bowls .
- Add crunch to above: Finish with a sprinkle of pistachios, almonds, sunflower seeds, sesame seeds, or cashews for extra crunch and healthy fats. Thinly sliced raw vegetables such as radishes, cucumbers or red cabbage also add texture.
- Swap tahini if desired: If tahini isn’t your thing, you can make a similar sauce with cashew butter or almond butter. Keep the garlic, lemon, and water the same and adjust the seasoning to taste.
- Turn it into a salad bowl: Add a handful of arugula, baby spinach, or chopped kale to a bowl and use a small portion of the farro. Tahini doubles as a creamy salad dressing, so you still get all the flavors in a more vegetable-heavy bowl.
- Top with vanilla: Finish with fresh parsley, cilantro, dill, basil or mint for a bright, fresh flavor.
- Switch up your ingredients: Avocados are also a great supplement, providing a source of protein and good fats. Add a dollop of garlic hummus, tzatziki, romesco, baba ganoush or roasted red pepper sauce. Or eat fresh herbs such as parsley, cilantro, mint, dill or basil.
- Make it cheesy: The cheese adds a bit of saltiness and flavor to the dish. Parmesan, goat cheese, or feta cheese is sprinkled on top of this delicious farro bowl for a delightful flavor. Seasoned tofu feta is also a great vegetarian alternative.
Store and reheat
Here’s how to store, reheat, and repurpose farro bowls to keep them delicious.
- Store in the refrigerator: Let the farro, roasted broccoli, and chickpeas cool completely, then store them in an airtight container in the refrigerator for up to 4 days. Place the tahini in a separate container to keep it smooth and pourable.
- Store in the refrigerator: For extended storage, freeze farro and roasted vegetables (without dressing) in an airtight container for up to 3 months. Thaw in the refrigerator overnight before serving.
- To reheat a meal: Reheat the farro and vegetables in the microwave or skillet over medium heat and add the water or stock. Add the tahini after reheating so it doesn’t thicken or separate too much.
- Remaining thoughts: Use leftovers as the base for grain bowls with different toppings, fold them into rolls, serve them with a toasted protein, or toss them into a big salad with extra veggies and herbs.
FAQ
Here are some of the most common questions readers have about this recipe.
Can I use frozen broccoli instead of fresh broccoli?
Yes, you can use frozen broccoli. For the best texture, spread the frozen florets on a baking sheet without thawing, toss in the oil and seasonings, and bake until they dry out and start to brown. You may want to give them a few more minutes so they get a little crispier.
Do I need to peel chickpeas before roasting them?
You don’t have to do this, but removing the loose skin can help the chickpeas become crispier. If you have time, gently rub the rinsed chickpeas with a clean towel to loosen some of the skin and pick out any loose parts. If not, they will still bake just fine as is.
Can I completely make the bowl before lunch?
Yes. For best taste, store cooked farro, roasted broccoli, and chickpeas in a container and wrap the tahini separately. Assemble and drizzle with sauce before eating. You can also add fresh toppings like herbs, nuts, or avocado at the last minute so they stay bright and crunchy.
How to prevent farro from turning to mush?
Make sure to use the correct liquid ratio, avoid overcooking, and drain off excess liquid as soon as the grains are tender. The farro should be slightly al dente, not mushy like risotto. If you’re not sure, start checking for doneness early and pull it off the heat as soon as it reaches a chewy texture.


